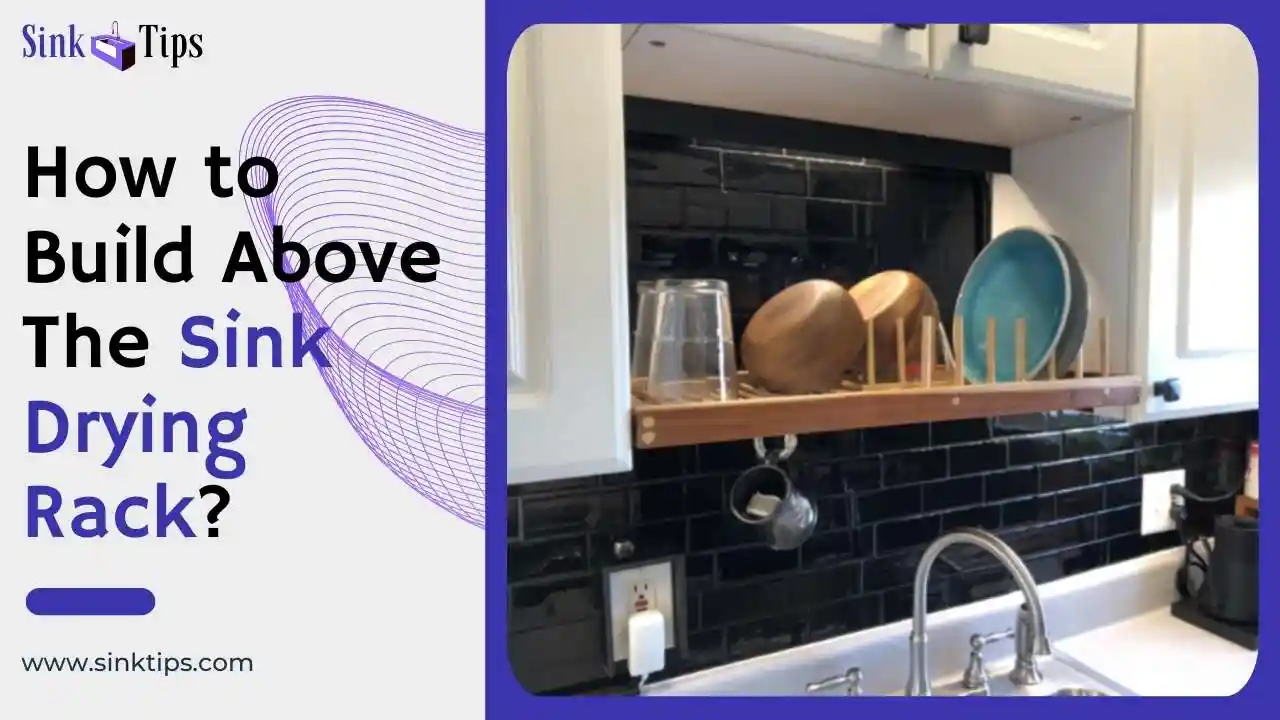
Having a drying rack above your kitchen sink can be a suitable and space-saving option for drying dishes and plates.
If you have a small space in your kitchen and you want to install a drying rack for washed dishes and plates.
So you have come to the right place.
Here, I am going to give you detailed information on how to build above the kitchen sink drying rack.
- Two Main Ways to Build an Above-Sink Drying Rack
- Materials Needed For Building Above The Sink Drying Rack
- How to Build Above The Sink Drying Rack? Step By Step Guide
- Step 1: Measure the Space Above the Sink 📏 📐
- Step 2: Decide on a design
- Step 3: Cut the Basswood Plank to Size 🪓
- Step 4: Sand the Cut Edges for a Smooth Finish
- Step 5: Drill The Hole in Basswood plank Strips For Wooden Dowels
- Step 6: Attach Brackets for Basswood Strips Using Wood Glue and Screws
- Step 7: Attaching the Wooden Dowels Using Wood Glue and Screws
- Step 8: Set up a Bamboo Plate Rack On One Side
- Step 9: Finishing Touches – Paint or Varnish the Drying Rack for a Polished Look
- Step 10: Installation and Testing
- Safety Precautions to Take to Make a DIY Kitchen Above Drying Rack
- FAQs
- How do I maintain and clean my drying rack?
- Conclusion
Two Main Ways to Build an Above-Sink Drying Rack
If you want to build an above-sink drying rack, then there are two options for constructing an above-sink drying rack.
Using Pre-Made Components
If you have no time to build your DIY drying rack, then use Pre-made Components of drying racks from the market or online shopping.
It provides convenience, some customization, durable materials, and easy installation.
Here, I suggest you the best pre-made drying rack for your above sink area.

MERRYBOX Over The Sink Dish Drying Rack
2 Tier Dish Rack Over Sink
Merrybox over-the-sink dish drying rack conveniently and neatly dries all utensils and dishware.
Building Your Drying Rack – DIY
It allows for full customization of size, shape, materials, and organization but requires more effort for proper mounting over the sink area.
In this article, I have given you the information below on how you can make your own above sink Drying Rack.
Materials Needed For Building Above The Sink Drying Rack
Building an above-the-sink drying rack is a practice and efficient solution to air dry dishes, bowls, utensils, and other kitchenware.
With a few materials and some basic woodworking skills, you can create a custom drying rack that fits perfectly above your sink.
If you want to build a handy drying rack above your sink, you need a few materials:
- Wooden Dowels – These will be used to hold plates and bowls. Get 1/2-inch diameter dowels.
- Bamboo Plate Rack – One side of the rack can have a bamboo plate holder. Choose one that fits plates up to 10 inches wide.
- Basswood Plank – To create the main frame of the drying rack
- Wood glue – For fixing wood parts
- Screw – To fix wood parts
- Drill – To create a hole in wood strips
- Saw – To cut the wood
- Sandpaper – To smooth the wood edges
- Measuring tape – for measurements
- Pencil – To mark when measuring
How to Build Above The Sink Drying Rack? Step By Step Guide
Let’s start our DIY process to build above the sink drying rack step by step.
Step 1: Measure the Space Above the Sink 📏 📐

First, measure the area you have available to build the rack.
Start by measuring the width and height of the space above your sink where you plan to install the drying rack.
Be careful to measure the sink faucet and any items that come in it.
This will help you determine the dimensions for the cedar board and wooden dowels.
Step 2: Decide on a design
Then, map out the size and shape you need for your rack based on the space and what you want to dry.
Consider the design and functionality you want for your drying rack.
You can choose a simple, straightforward design or a more complex pattern. Sketch on paper to visualize how your design will look.
Step 3: Cut the Basswood Plank to Size 🪓

Now, using the measurements from Step 1, cut the Basswood Plank to the desired length for the right and left sides using a saw.
Then, cut a strip of wood 5 inches wide and the length to fit the space above your sink, which will be your front and back pieces from Basswood Plank that will hold the dowels and bamboo plate rack.
In this process, make sure to wear safety goggles and follow proper safety precautions when using power tools.

Step 4: Sand the Cut Edges for a Smooth Finish
After cutting the strips, use 150-grit sandpaper to smooth out their rough edges.
This will give your drying rack a polished look and prevent its sharp corners from chafing.
Step 5: Drill The Hole in Basswood plank Strips For Wooden Dowels

Now, we have four strips of wood, which make a rack frame.
Clamp together the front and back wood strips, and measure and mark holes centered every 1.5 inches along the lengths of the wooden dowels.
Then, drill 1/2-inch holes completely through both pieces at the same time with an Electric Power Drill press for straight holes.
Step 6: Attach Brackets for Basswood Strips Using Wood Glue and Screws
After creating holes now, attach L-brackets to each corner to assemble a rectangle frame. These brackets attach with wood glue and screw.
Use wood glue for this attachment before inserting the 1 screw (1/4 inch).
Step 7: Attaching the Wooden Dowels Using Wood Glue and Screws

After attaching brackets, now insert 1/2-inch Diameter and 6-inch long wooden dowels in the front and back sides of the basswood strip holes.
Before inserting dowels use wood glue and secure them in place with a screw to fit permanently.

Step 8: Set up a Bamboo Plate Rack On One Side

Add a bamboo plate rack to one side to make your DIY woody drying rack look great.
To fit this bamboo plate rake to the drying rack, use the wood glue at the bottom and screw it from the bottom so that it does not move.
Which provides extra space for drying plates, bowls, and other items.

Step 9: Finishing Touches – Paint or Varnish the Drying Rack for a Polished Look

Now, it is time for the final touch; you can paint or varnish the drying rack as your kitchen decor.
For that, you should choose a non-toxic paint, varnish, or polyurethane that is unsafe for kitchen use.
Apply 2-3 coats of paint for a durable finish, and remember to let each coat dry before applying the next coat.
So that the drying rack gets a polished look.
Step 10: Installation and Testing

Now, the last step is that once the drawing is complete and dry, it’s time to install it above the sink.
If there is a wall on the left and right above the sink, we can fit it with screws or brackets to securely mount the rack.
Or, if there is no wall, you can cut 4 wooden strips the same size (15 inches) and fit them under the rack with screws and wood glue.
Just pick it up and place it on top of the sink. 😎
Test for stability before regular use.
Safety Precautions to Take to Make a DIY Kitchen Above Drying Rack

While you follow all the steps shown above, there are some safety precautions you need to take.
Below, I have suggested safety precautions that you should consider.
Protect your Eyes with Goggles
When working with wood, it is important to wear protective goggles to shield your eyes from any dust particles.
Use a Dust Mask when Sanding
When sanding wood, wear a dust mask to avoid inhaling fine particles that can be harmful to your respiratory system.
Handle Sharp Tools with Care
Whether you are using a saw or any other sharp tools, always exercise caution to prevent any potential accidents.
Ensure Proper Ventilation
When you painting or varnishing, it is crucial to work in a well-ventilated area to avoid inhaling any harmful fumes.
Adhere to Wood Glue Instructions
To ensure the proper setting of wood glue, carefully read and follow the instructions provided on the packaging.
Prioritize Safety at all Times
You remember to prioritize safety by following these precautions and any other relevant safety guidelines.
FAQs
How do I measure my space for a drying rack?
You measure the width and depth where the drying rack stands. Additionally, height also measures if it hangs or folds.
Consider clearance for airflow and faucet place access.
How much time does it take to build a drying rack?
The time it takes is based on the complexity of the design and materials used in this approach.
It can take approx 6-8 hours to complete the project.
How much does it cost to build a drying rack?
The cost of building a drying rack can vary depending on materials and complexity.
But expect to spend around %50 to $100 for materials like wood, hardware, and wood glue if opting for an approximately 36-inch wide custom DIY build.
How do I waterproof and seal the wood?
If you want to waterproof and effectively seal your wooden drying rack, apply three thin coats of either moisture-resistant polyurethane, marine varnish, or penetrating oil to all surfaces.
Allow sufficient drying time between each coat before using or mounting the rack above the sink.
How do I maintain and clean my drying rack?
Clean your drying rack regularly with a wood-safe multi-surface cleaner and dry thoroughly.
Reapply moisture-resistant sealant periodically to maintain water resistance and longevity.
Conclusion
In this way, you can make a drying rack above your kitchen sink by yourself, which will suit the limited space of your kitchen.
With a few simple materials, tools, and safety steps, you can build a handy space-saving rack to fit your needs.
Congratulations, you have completed your above sink drying rack.
So, you not only create a practical kitchen solution, but you also add a personal touch to your space.
Apart from this, if you need any more information related to the kitchen sink, feel free to comment, and I will reply as soon as possible.